Building & Managing Web Sites with
Microsoft Technologies
Lab 8 - Client-side Dynamic Content 1
Step 1 - Getting Started
Create a child web called "Lab8" on either your local Personal Web
Server. Create a directory called "Lab8" and create a page called
"Default.htm". All of the pages you create and all of the content you
import in this lab should be created/imported in this same directory.
 |
Step 2 - Create an Animated GIF To the left are a series of images you will turn into an animated GIF. Download the zip file of these graphics, and unzip them into your C:\temp directory. Then launch Microsoft GIF Animator from FrontPage 98 (under the TOOLS menu), and import the graphics by dragging and dropping them into the empty cursor (square). Arrange the graphics in the order shown to the left using the up and down keys. The "Duration" of each graphic should be set to 50, and both the "Left" and "Top" properties of the smaller number graphics should be set to 30. Use the online help to learn more about the "Undraw Method" property. Test the graphic and save it to your c:\temp directory. Then import the graphic into your child web and add it to your default.htm page described in Step 1.
|
Step 3 - Add a Java Applet
Go to one of the Java applet sources discussed in lecture. Download and import
the applet .class files into your child web. Using the applet documentation or example,
copy the HTML source into your default.htm page to install the applet. Preview your page
and see if the applet works.
Step 4 - Add a Flash Animation [Optional -- this will not be
graded]
Create a new page called flash.htm. Go to the Macromedia web site and
download/install the Flash viewer. Then go to the Flash
demonstration page mentioned in lecture on the Valtara.com website. View the
Flash animation. Then find the file you viewed by going to your browser cache and finding
the file (C:\WINDOWS\Temporary Internet Files\matchbox.swf). Import it into your child
web, and use the HTML source listed in the lecture to add the Flash file into the
flash.htm file. Preview your page in a browser to make sure it works.
Step 5 - Add an ActiveX Control [Optional -- this will not be
graded]
Create a new page called ActiveX.htm. With the page open in FrontPage Editor, select
"Advanced - ActiveX Control..." from the INSERT menu. Look at the
list of controls in the "ActiveX Controls Properties" window and insert at
least 2 controls onto your page. Examine and experiment with the other parameters provided
on this dialog box. Examine the HTML source generated. Then preview your page, both with
Internet Explorer and Netscape Navigator.
Step 6 - Create a Data Entry Form
Reopen the default.htm page and edit the page so it matches the data entry form below.
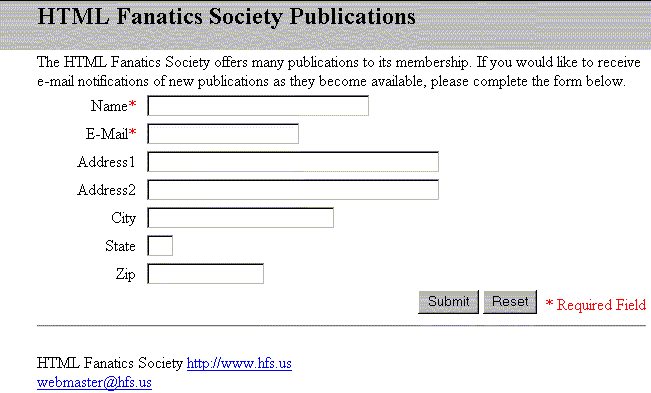
Use the "EmptyAlert" Javascript code discussed in class to do field level validation on the NAME and EMAIL fields.
<script Language="javascript">
<!--
function EmptyAlert(theField,s)
{
if ((s == null) || (s.length == 0))
{
alert(theField.name + " must be
completed.")
theField.focus()
return false
}
}
-->
</script>
Add form level validation to the page using the "FormCheck()" Javascript code below. Modify the Javascript to check the e-mail address as well.
Notes:
Here is an example of validation done on the OnSubmit Action of a button, Notice the use
of the forms object syntax.
Placing the values into variables before manipulating can ease debugging as well as speed
up the performace as multiple dotted object references can be expensive. Notice also the
use of 0 for false and the addition of the semi-colon. Depending on the browser, spacing
and punctuation may effect the codes workability.
<script Language="javascript">
<!--
function FormCheck()
{
var F = document.forms[0].YourName
var V = document.forms[0].YourName.value
if ((F == null) || (V.length == 0))
{
alert("Please
complete the name field.")
return 0;
}
}
-->
</script>
This line would invoke the above function against the form when submitted:
<form method="POST" action="reply.asp" name="HFSPost" onsubmit="Return FormCheck()">
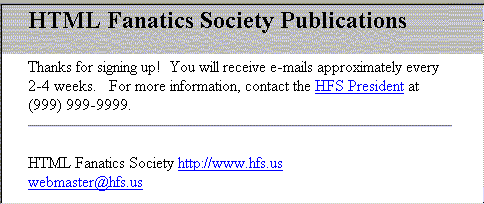
Step 7 - Create a Reply Page
Using your default.htm as a template, create a page called reply.asp
Step 8 - Publish Content to Class Webserver
Save your pages. Publish the content you have created on your local Personal Web Server to
your child web on the class web server. Select "Publish FrontPage Web..."
from the FILE menu, select "More Webs", and type in the path to your child web
and click OK. Since your local child web does not have any content except for the
Lab8 directory, only this content will be published into your child web.